I'm starting to put the plywood planking on the frame. First I have to scarf pieces of plywood together to make longer pieces. I'm not sure how you are supposed to do this, but this is how I am doing it. I clamp the plywood sheet over the boat, mark the outline where I want to cutout, then cut it out.
To make the scarf joint, I clamp four plywood pieces on top of each other on a table, with the edges stepped 3 inches apart. I use a hand plane and belt sander to make the 3 inch steps into a smooth ramp (with a 12:1 slope). Here is what it looks like finished. Not bad for my first plywood scarf.
I then test fit the pieces onto the boat and mark a straight line across the scarf joint, so that I can line them up about right when I glue them. I cut the pieces slightly wider than necessary, in case I don't scarf the pieces perfectly straight. Then I trim them more accurately with a hand plane after they are scarfed together.
Here is a pic of one plank already on the boat and another set being glued together. I just wrap the glue joint in plastic and put textbooks and an old axle on top to press it all together. I like textbooks, because I have them laying around and they are flexible, so they create even pressure on the glue joint. Sandbags or something would also probably work.
After the scarf joint is glued and the plank is trimmed to fit, it's glued and nailed to the frame. The nails went into the wood frame without splitting it, but I had quite a hard time sinking the nail heads below the surface of the hard plywood when installing the first plank. (Imagine me quickly hammering on a nail punch trying to finish before the glue cures, cursing while I keep smashing my hand with the hammer). So I modified a cheap wood drill bit to make a counterbore. The bit makes a nice flat counterbore with a shallow dimple to help start the nail (but not an entire pilot hole). This makes nailing the planks much easier. I make the counterbores very shallow, since this is very thin 1/4 inch plywood.
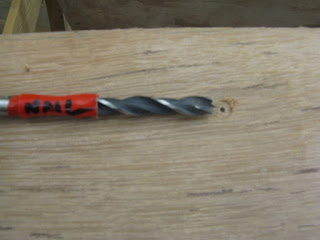
So I clamp the plywood to the boat (again), countersink all the nail locations, remove the plywood, apply the glue, and quickly nail it all back together before the glue cures. I punch the nail heads slightly beneath the surface of the plywood and cover them with thickened epoxy.
And here is a picture outside my garage workspace ... cold and snowy, but I'm still building in comfort.
Hmmm let's see, do I have any good animal pics ... here's a good one.
Tuesday, December 29, 2009
Sunday, December 20, 2009
Centercase installation
Building a boat takes a toll on your relationships with your loved ones. Here is Chloe barking at me telling me to stop working and pay attention to her. I listened and took a break.
This week, the sides of the centercase were glued together. I also added vertical strips of lumber on the side of the case for attaching the bulkhead. I attached those at this stage, since I wanted to nail it from the inside before putting it together. I also drilled the hole in the case logs for the centerplate pivot bolt, since this would be almost impossible to do after it's in the boat.
The centercase was then installed in the boat. The case was wiggled into position and pilot holes were drilled for the 3" bronze nails. The oak is really hard to screw into, so I had to put it all together (to make sure the screws went in without a problem), take it apart, then put it back together again with glue. Quite time consuming with 20 large screws, but the epoxy cures too fast to try to do it all at once.
Here is a pic after its installed with thickened epoxy. After it was screwed in, I poured unthickened epoxy in all the cracks on the top to fill in all the joints. The unthickened epoxy would normally leak out of a joint, but the thickened epoxy underneath kept it from leaking out. Temporary wedges were jammed into the slot to close the vertical glue joints nice and tight. It went together without a problem, except its sitting SLIGHTLY crooked, but I don't think anyone will notice except for me. The top of the case is about 3/16" off vertical. Not a problem.
The next day when the glue is dry, the wedges are removed and the sides are trimmed flush with a saw.
This is a top view of the front of the centercase. If you look close, you can see a thin white layer of fiberglass on the inside of the case. You can also see that the inside of the case has some epoxy fillets that I made when I was gluing the case together.
The keelson (large backbone member) is then shaped (with a hand plane) into a wide v-shape, so that the curved plywood bottom can fit up to it. So I guess that's it ... here's a skeleton of a boat! Next week I'll start the plywood planking.
Sunday, December 13, 2009
Transom Installed
The inside of the centercase is being fiberglassed. The process involves multiple coats of epoxy and one layer of fiberglass fabric. The fiberglass is transparent after it soaks up the epoxy. (Thanks to my heated garage I can epoxy all winter long).
Also, the transom has been cut out and installed. The transom was glued and nailed with bronze ring shank nails. At first I was more comfortable using screws, beacuse I was worried that the nails would split the frames or something. However, so far the nails have worked great with Douglas Fir, but I have to predrill little holes when nailing into the white oak. I've been punching them a little below the surface of the plywood, which hides the head and also helps close any gaps on the other side and gets good glue squeeze out.
Here are pics of the plywood being marked for cutting and then the transom after its glued and nailed. The plywood was roughly cut and the edges will be cleaned up after the glue dries. It's 3/8" plywood, thicker than the 1/4" used for most of the hull.
Wednesday, December 9, 2009
Modified centercase slot details
Here is a section view showing how I modified the centercase connection to the keelson, in case I lost you on one of those previous posts. As I said in a previous post, I widened the slot from 3/4" to 1-1/4" and extended the 1/4" plys through the keelson. This makes the connection much more rigid and makes nice continuous plywood sides on the inside of the case, instead of having the keelson exposed for rot to start. I'm going to epoxy the centercase in place instead of using mastic.
This modification isn't a novel idea. I read in forums that some Hartley builders have done this and its actually listed as an alternative on the TS16 plans. They say they are happy with it and it makes a nice watertight connection. I'll let you know in a few years if I still think it is a good idea.
A brief lesson on centerplates
For those of you not familiar with trailer sailboats, let me explain what the centerplate is and how it works.
As shown in the diagram below, the centerplate rotates on a bolt or pin. It's completely lowered during sailing and raised for trailering and beaching the boat. It's raised and lowered using a pulley system (also shown in the diagram) or winch. The centercase has an open slot through the bottom of the boat. Since this slot is basically a large hole in the bottom of the boat, the centercase will fill partially with water. It has to be well sealed and the sides have to be high above the waterline so the boat doesn't take on water. (Or on some boats, the top of the case is sealed somehow).
So why does my boat even have a centerplate? Well, I won't get too into all the physics, but it's because sailboats need a large underwater area to provide lateral resistance. This lateral resistance allows the sailboat to sail upwind. When sailing upwind, the force created by the airfoil of the sail on the boat is diagonal, trying to pull the boat forward, but also trying to push it sideways. The centerplate keeps the boat from slipping sideways across the water.
Smaller sailboats use daggerboards, which are the same as centerplates, except they are simply pulled out of the top when not in use, instead of rotating into a centercase. If the boat runs aground in shallow water, the centerplate rotates up and the boat is usually undamaged. The more rigid daggerboard can cause more damage to the hull when running aground.
Small sailing dingies without a centerplate or daggerboard cannot sail upwind! Well, actually, it's difficult to sail in any direction other than that of the wind. Most larger sailboats don't need a centerplate to sail upwind, because they have large fixed keels that provide the necessary lateral resistance. The Hartley plans actually show two large fixed keels on either side of the bottom of the hull as an alternative to the centerplate, but this would make trailering difficult. I've never seen a Hartley TS14 or TS16 with fixed keels.
The centerplate on my boat is made of heavy steel, thus serving another purpose: ballast to keep the boat from heeling too much and make it more stable. So if the centerplate is not lowered before raising sails, the boat is unstable, difficult to control and may capsize.
But here is safety issue to think about ... what if the boat does somehow tip over on its side during sailing? Then gravity may cause the centerplate to flip into the centercase, thus raising the center of gravity of the boat, making it more likely that the boat will flip completely upside down (or "turtle") and making it very difficult to right. To solve this problem, a lot of sailboat owners have a locking mechanism to keep the centerplate down at all times, except when in shallow water. This locking mechanism makes the boat much more "self-righting". If a small boat gets on its side and does not self-right, the wet sailors simply stand on the side of the protruding centerplate and pull the boat back upright. And if the boat turtles even with the centerplate extended, the centerplate can still be used as a lever arm to try to right it.
Tuesday, December 8, 2009
Cutting slot in the keelson
Before I take the centercase apart, I'm cutting the slot in the keelson (the main backbone) and checking to make sure the centercase fits into it. A lot of sailboats have the problem of water leaking in around the centercase, including Hartley sailboats. I decided to modify the centercase design, like a few other Hartley builders have done. The standard centercase sits on top of the keelson (with a 3/4" wide slot through the keelson). I widened the slot to 1-1/4" and extended the centercase sides through the keelson. (Well, actually only one layer of 1/4" plywood extends through the keelson on each side, so the slot in the keelson doesn't have to be 1-3/4", which would leave too little of the 3-1/4" wide keelson.) And I'm going to permanently epoxy and screw the centercase into the keelson, instead of just using mastic and screws. This should keep the centercase from wiggling back and forth and leaking, however I won't be able to remove the centercase. (The original centercase design seems very difficult to remove also ... and why would I ever want to do that anyway?)
Here are some pics after I cut the slot. I used a circular saw and then a file to get it just right. The centercase is dry fit in place just to see how it looks. If you notice, I also had to cut one of the frames in half to make room for the centercase. The plans don't say anything about that. Luckily, I figured this out a long time ago and didn't screw the keelson to that frame.
Constructing the centercase
The centercase is going to be the new home for my centerplate. The sides are made out of 1/2" marine plywood. (I laminated two layers of 1/4" plywood with epoxy.) The lumber is white oak, glued and screwed from the inside to the plywood. The slot in the centercase is 3/4" wide, plenty of room for the 5/16" thick centerplate.
The pic shows the centerplate and centercase side-by-side. In this pic, the centercase sides are glued up, but the sides are just temporarily screwed together. I'm going to take it apart and fiberglass the inside of it for more abrasion resistance, then put it back together with glue and install it in the boat.
Shaping the frame
Monday, November 23, 2009
Chines and Stringers
The second layer of chines and gunwales and the smaller stringers have been installed. All of these are attached with bronze screws and thickened epoxy.
The boat may look like this for awhile. Next I have to shape the frame so that the pieces of plywood planking will fit up nicely. But before the planking, I'm going to make the centercase (or centerplate trunk) and maybe install it. And I have to sand all the unwanted epoxy lumps off.
Saturday, November 21, 2009
Garage Sealed and Heated
The garage has been getting too cold to epoxy. The temperature needs to be at least 55F for a few days at a time for my epoxy to set properly. So I either have to wait until spring or come up with a way to heat the garage. I was thinking about buying a heater and garage door insulation, but all of that costs a lot of money. I found a way to satisfactorily heat the garage without spending any money at all.
The most important thing was to stop all the cold air from coming in. Stopping all the drafts must be done before insulation is added. I temporarily decommissioned my garage door and covered it with a large plastic sheet and 2x4s that I had laying around, being careful to seal it as best as possible around the edges and bottom. I patched up some holes in the drywall and taped the cracks around the attic hatches. By leaving the door to the house open, the garage becomes part of the heated space of the house. I didn't need to install a duct feeding the garage, because the furnace naturally sucks warm air from the house into the garage when its running. It's not the most efficient or safe setup ... but it's definitely the most cost effective solution for one or two winter seasons. It's not efficient because the garage space isn't completely insulated and also the furnace is now sucking warm air out of the house and releasing it out the roof vent. Nonetheless, I now have a heated garage and only marginally more expensive heating bills.
The garage is at a cozy 62F when its in the 40's outside and 68F inside the house. It could be warmer if I added insulation but that costs money. The coldest surface inside the garage is probably the concrete floor ... and I'm never going to try to insulate that.
One problem is that my garage isn't long enough to plane long pieces of lumber with the garage door closed ... so I stick the ends of the lumber through the open living room door to feed them into the planer! (I have a very understanding wife ... as long as I have a curtain up to keep the sawdust out of the house).
The garage door probably won't be opened until the flipping.
Sunday, November 1, 2009
Chines being installed
The first layer of the chines and gunwales has been installed. When I was installing them, none broke and only one sprung back and hit me in the head! Success. I started by cutting a bevel in the front to fit up to the stem. I attached each of them to the stem, then glued and screwed to the frames. A pretty simple process as long as the pieces of wood don't break.
I decided not to screw them into the foremost frame (frame #1), because I was worried that the screw hole could cause the piece to crack in this high stress area. This worked fine, except the force of the bent gunwale pushed this frame aft slightly. Some temporary wedges and clamps are used to hold everything in position until the glue sets.
Tuesday, October 27, 2009
I'm back
OK I'm done with that silly test and now I can work on the boat more. I actually have been working on it a little, but I haven't had time to update the blog.
I've installed (epoxied and screwed) the keelson and the stem (the main backbone members). The keelson is two layers of lumber, since one layer would be difficult to bend into position. The image below shows the second layer being dry fitted before gluing. I learned quickly that I need to screw everything together, take it apart, then glue and screw it together.
Here is a pic of the stem and keelson after the glue set. All that excess glue will be sanded off.
This step took awhile, because I had to make sure all the frames were square and just right before permanently gluing everything together. Measure 100 times, epoxy once ... that's been my strategy so far.
I decided to buy a cheap ($200) bench planer. Unless the boat design uses all standard lumber sizes, I don't see how it would be possible to build a boat without one. My boat requires a lot of 5/8" thick lumber. I was considering going to my friendly boat shop and using their planer, but transporting the lumber back and forth wouldn't be practical. I've been making the chines, gunwales and stringers using a table saw and planer. I also scarfed pieces together with epoxy, since I only have 12ft long lumber and the boat is 14ft long. They are almost ready to be bent onto the frames. I'm just waiting a few days for the scarf joints to cure completely so they don't break when I try to bend them.
Tuesday, September 22, 2009
Minor delay
I have to use my free time to study for a test. My next blog will be at the end of October, after the test. Then I'll make some significant progress on the boat.
Monday, September 7, 2009
Trailer ALMOST done
The trailer is almost put back together. I installed the LED lights and wiring.
I also put the axle, hubs and wheels together. It was my first time packing bearings, so I made a big greasy mess.
I just need to install the fenders and touch up the paint, then I'll be done with the trailer for now. After I finish the boat, I will have to adjust the roller and bunk positions ... but that's going to be in awhile.
I didn't get a chance to work on the boat at all this week. Next week for sure.
Sunday, August 30, 2009
Trailer painted and being reassembled
I've just been working on the trailer over the last few weeks. I bought more wood for the boat, but I decided to just finish the trailer so I can get all these trailer parts and grease out of my garage. I primed and painted all the parts of the trailer, using a roller and brush. Like all my paint jobs, it's a 50 foot paint job, (it looks good from 50 feet away.) The color of the trailer is also the trim color for the boat, so they will match.
Now I'm slowly assembling the trailer ... if I can remember where all the parts go. (I took pics of everything before disassembly for reference.)
I painted the trailer frame instead of galvanizing it, because galvanizing was too expensive. I did however buy all galvanized replacement parts (which are not on the trailer yet), so the trailer will have galvanized wheels, hubs, and axle.
Next week, I'll show the completed trailer and perhaps some progress on the boat!
Sunday, August 16, 2009
Still working on trailer
The lumber store said it will be a few weeks before they get more of the wood I want (1X6 CVG Doug-Fir), so I'm just working on the trailer for now.
I ordered some parts online. I'm getting new tires and wheels, a new axle, new lights, and a few other accessories. I may also get some new hubs, because I just noticed that one of them is cracking. So basically, almost every component of the undercarriage was damaged.
I also stripped a lot of the paint off of the frame. I decided to take the old paint off, because there were some flaky rusty spots, which is no good to paint over. I used chemical paint stripper and then naval jelly (which has phosphoric acid to dissolve the rust ... interestingly, an ingredient in Coca Cola). Maybe hiring someone to sandblast the frame would have made more sense, because this is a lot of work with nasty chemicals. I couldn't get all the paint off, but most of it. I'm almost ready to prime and paint.
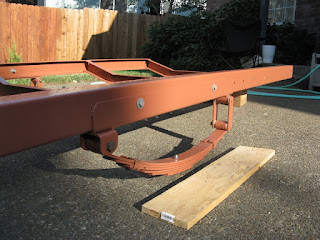
(Note that the brown spots still on the frame are mostly brown paint, not rust).
There are a lot of other small parts to paint. This is going to take a little while.
Sunday, August 9, 2009
Frames complete. Trailer dismantled.
The frames have been finished and attached to the strongback. You can start to see the shape of a boat forming in my garage. Some temporary braces are placed across each frame at certain heights specified in the plans. These braces rest on the strongback at specified spacing, ensuring that the frames are at the proper location as the boat is being built. I'm waiting for some more wood from the lumber store. When I get it, I'm going to continue construction of the skeletion of the boat.
In the meantime, I'm dismantling the trailer and stripping the old paint off the frame. It's not nearly as fun as building the boat and hard work, but necessary.
One major problem I found with the trailer is that the axle needs to be replaced. As shown below, one of the spindle surfaces was seriously damaged. The trailer showed obvious signs of overloading and neglect when I bought it, so I guess I should have expected to find something like this. If I would have used the trailer as it was, the bearings would failed in no time for sure. I'm glad I decided to completely overhaul the trailer. It'll be much more reliable and not a worry.
Saturday, August 1, 2009
Boat Trailer Aquired
I bought a used boat trailer on Craigslist. $240. It needs a little work, but it's the perfect length and has all the features I want. I couldn't pass it up. This steel trailer is a 1972 Gator Trailer made in Florida. (The company is no longer in business). The only info I could find online about the company is here:
http://www.feathercraftboats.com/Gator%20Trailers.htm
It seems the 1950's and 1960's trailer frames were round tubular construction, but this one is open c-channel ... which I think is better, because it won't rust from the inside out as long as I keep it painted. (A steel tubular trailer should really be galvanized, especially if its going to be in salt water.)
I can't figure out how much weight this particular trailer can haul. I'm sure my boat won't be too heavy for it, but it could be too light (then the springs would be too stiff and my boat would have a rough ride). I jumped up and down on it (I do that with any large purchase) and the springs seem about right. I also lifted one side ... I would guess it weighs about 350 lbs.
This trailer has a row of keel rollers down the middle that support the majority of the weight of the boat, as well as bunks on the side that keep it stable. This is an ideal trailer setup for a wooden hull, in my opinion. The trailer is also tilting, which means I will be able to beach launch the boat without a boat ramp ... very cool. That longitudinal board down one side is a metal platform for walking on so you don't get your feet wet ... I like it.
Ok, actually, there's lots of work to be done on it, which I will be doing concurrently with the boat construction. The tires and wheel bearings need to be replaced. The lights and wiring need to be replaced too. I also plan to paint it to match the boat and maybe get new fenders to make it look better. The carpet on the bunks seems to be shag from some granny's bathroom, so that should be replaced. I also need to get a spare tire and wheel. Then I need to adjust the trailer to fit my boat, including the axle and bunk positions. I will probably have to spend a few hundred bucks and a few months fixing it up. But I can't find a new trailer like this anywhere ... and if I could, it would be pricey.
So ... now maybe my blog should be titled "Hartley TS14 Construction and Trailer Restoration", because I plan to include the details of the trailer restoration in my posts.
Subscribe to:
Posts (Atom)