The original $5000 budget has been exceeded. Don't get too worried though ... I already purchased almost everything I need to complete the hull. But I still need to buy sails, rope, some of the hardware and outfitting (life jackets, etc). I'm increasing the budget to $6500 to cover the costs of these items.
Remember, this budget includes EVERYTHING I need to get out on the water, not just an empty hull. I estimate that this boat design could be build anywhere from $2000-8000, depending on the quality of materials chosen. However, I think a more reasonable price range would be more like $4000-$7000 for the boat, trailer, and everything except an outboard motor.
I've chosen fairly high quality materials. I figure that I'm investing so much time building, that spending money on quality materials makes sense. The quality materials make a boat that lasts longer, performs better and is easier and cheaper to maintain. This boat will easily outlive me with just minimal maintenance (painting, minor repairs, etc). However, a $2000 "home depot special" boat would be in poor shape after just a few years. It's not even worth the time to build this cheaply in my opinion. If my budget was $2000, I would have just bought a used fiberglass boat and fixed it up. (If you are not interested in the boat building hobby and just interested in getting the best sailboat for your money, this is the way to go).
The main budget buster for me so far was the trailer ... I thought I could get something decent for $200 or so. Nope, it cost me more like $700+ to make a nice trailer that will safely transport my boat. Money well spent I suppose. Sometimes you forget that the boat travels more on land than on water ... a good trailer is important.
When I get closer to completion, I'll post a pie chart or something showing how much I spent on each category ... (wood, glue, fasteners, paint, sails, hardware, trailer, outfitting etc). Right now it's difficult to list all the things that I have or haven't bought yet.
Monday, February 1, 2010

Sunday, January 31, 2010
Skeg and Capping Peices Fabricated
The lumber (1 1/4" thick white oak) is placed on the boat and a block and pencil is used to draw the shape of the boat onto the lumber.

The lumber is cut using a circular saw and the edge is cleaned up using a belt sander with 50 grit sand paper ... (which makes a great power planer for this task). I made sure there were no gaps underneath the skeg and that it was not leaning to one side.

The top of the skeg is perfectly horizontal ... (yay a straight line finally!) So I used a tight string (leveled with a string level) to mark the top edge. Then it's cut with a circular saw.

The front of the skeg is checked out to accept the next capping piece. This was done with a table saw set at a low blade height. This worked well, except the bottom edge got chipped a little.

Next the holes are drilled and countersunk for the through bolts. These bolts are hot dipped galvanized steel. It's normally not a good idea to mix metals like these galvanized steel bolts and bronze screws and nails. However, since this is a trailer boat, this won't cause any corrosion problems most likely. Also, bronze is higher on the galvanic series than galvanized steel, so the steel will corrode first if there is a problem. I may have to replace the bolts once every 20 years, but at least the permanent bronze screws will last forever. (For those of you still concerned, just pretend the bolts are sacrificial zincs).

The two capping pieces on either side of the centercase slot are made the same way as the skeg. (Except these pieces are going to be installed using large screws instead of through bolts).

They are also faired slightly on the sides where they meet the skeg using a belt sander. (I'm kinda embarrassed that I use the belt sander so much, but it works so well!)

Next week I'm going to make some more capping pieces for the front of the boat, then take it apart and install all of them with glue.

The lumber is cut using a circular saw and the edge is cleaned up using a belt sander with 50 grit sand paper ... (which makes a great power planer for this task). I made sure there were no gaps underneath the skeg and that it was not leaning to one side.

The top of the skeg is perfectly horizontal ... (yay a straight line finally!) So I used a tight string (leveled with a string level) to mark the top edge. Then it's cut with a circular saw.

The front of the skeg is checked out to accept the next capping piece. This was done with a table saw set at a low blade height. This worked well, except the bottom edge got chipped a little.

Next the holes are drilled and countersunk for the through bolts. These bolts are hot dipped galvanized steel. It's normally not a good idea to mix metals like these galvanized steel bolts and bronze screws and nails. However, since this is a trailer boat, this won't cause any corrosion problems most likely. Also, bronze is higher on the galvanic series than galvanized steel, so the steel will corrode first if there is a problem. I may have to replace the bolts once every 20 years, but at least the permanent bronze screws will last forever. (For those of you still concerned, just pretend the bolts are sacrificial zincs).

The two capping pieces on either side of the centercase slot are made the same way as the skeg. (Except these pieces are going to be installed using large screws instead of through bolts).

They are also faired slightly on the sides where they meet the skeg using a belt sander. (I'm kinda embarrassed that I use the belt sander so much, but it works so well!)

Next week I'm going to make some more capping pieces for the front of the boat, then take it apart and install all of them with glue.
Fiberglass Hull
After the hull is shaped about right, the fiberglass goes on. Here's how I did it ... I hope it lasts.
I spread a coat of epoxy on the hull, so the dry spots could soak it up. I let it cure for a half a day, then while the epoxy was still slightly tacky, I stuck the fiberglass fabric onto the hull. The fabric is overlapped at the seams.

Then the epoxy is wet out. The epoxy is poured onto the hull, then squeegeed off using a reasonable amount of pressure. Just enough epoxy is used to glue the fabric to the hull, but not to fill the weave. It was pretty easy, except little wet fiberglass hairballs and frayed edges made it a tedious and messy process.

The fabric becomes transparent when wet out, but the weave is still raised and visible.

Each coat of epoxy is applied before the one before it completely cures. (If I didn't do it this way, I would have to sand between each coat to get good cohesion).
The next coat fills the weave partially. The bumps in the hull caused by the fiberglass overlaps, etc. are sanded off and some thickened epoxy is also used to fair these areas a little. Then another coat is applied to fully fill the weave.


After these coats, I noticed quite a few bumps in my once smooth hull, so I decided to completely sand the hull down again (being careful to not dig into the fiberglass cloth). I'm glad I did this extra work because now the hull is much smoother. I'll later apply another coat of epoxy before painting to make up for this extra sanding. But first I'm going to install the skeg and capping pieces.

I spread a coat of epoxy on the hull, so the dry spots could soak it up. I let it cure for a half a day, then while the epoxy was still slightly tacky, I stuck the fiberglass fabric onto the hull. The fabric is overlapped at the seams.

Then the epoxy is wet out. The epoxy is poured onto the hull, then squeegeed off using a reasonable amount of pressure. Just enough epoxy is used to glue the fabric to the hull, but not to fill the weave. It was pretty easy, except little wet fiberglass hairballs and frayed edges made it a tedious and messy process.

The fabric becomes transparent when wet out, but the weave is still raised and visible.

Each coat of epoxy is applied before the one before it completely cures. (If I didn't do it this way, I would have to sand between each coat to get good cohesion).
The next coat fills the weave partially. The bumps in the hull caused by the fiberglass overlaps, etc. are sanded off and some thickened epoxy is also used to fair these areas a little. Then another coat is applied to fully fill the weave.


After these coats, I noticed quite a few bumps in my once smooth hull, so I decided to completely sand the hull down again (being careful to not dig into the fiberglass cloth). I'm glad I did this extra work because now the hull is much smoother. I'll later apply another coat of epoxy before painting to make up for this extra sanding. But first I'm going to install the skeg and capping pieces.

Sunday, January 17, 2010
Bottom Planking Installed
The bottom planking was successfully installed ... with a little help from the missus. We used some screws to help bend the front part down and nails everywhere else. Valerie held the ply in position while I screwed the front few screws. Then I climbed up on top of it to bend it down and screw the rest of the screws.


We then hammered all the nails in.

And while Valerie was covering the nail heads with glue, I was crawling underneath trying to clean up and fillet the glue around the stringers and chines inside the boat.

The process wasn't too difficult and we were able to do everything before the glue set. Having a helper sure is nice ... even if it is a rare occurrence.
Here are some pictures of the boat now with both bottom plywood pieces installed and it all sanded smooth. The epoxy is really difficult to sand, but it didn't take too long. I mainly used a belt sander believe it or not. A flat spot all along the centerline was planed using a belt sander. (Capping pieces are later going to be installed there). There were some spots on the hull that weren't fair and some nail heads still uncovered, and I applied some thickened epoxy to these areas. So that's what the wet spots are in the pictures below.


After I sand again, I'll start applying fiberglass, probably next weekend.


We then hammered all the nails in.

And while Valerie was covering the nail heads with glue, I was crawling underneath trying to clean up and fillet the glue around the stringers and chines inside the boat.

The process wasn't too difficult and we were able to do everything before the glue set. Having a helper sure is nice ... even if it is a rare occurrence.
Here are some pictures of the boat now with both bottom plywood pieces installed and it all sanded smooth. The epoxy is really difficult to sand, but it didn't take too long. I mainly used a belt sander believe it or not. A flat spot all along the centerline was planed using a belt sander. (Capping pieces are later going to be installed there). There were some spots on the hull that weren't fair and some nail heads still uncovered, and I applied some thickened epoxy to these areas. So that's what the wet spots are in the pictures below.


After I sand again, I'll start applying fiberglass, probably next weekend.
Sunday, January 3, 2010
Bottom Planking
So far I have installed 4 planks of plywood on the sides of the boat. Next are the two large pieces on the bottom. Here are some pics of one of them being scarfed together. I have to make another one for the other side. Yeah, it'd be nice if I could teach my dog to stay off the plywood while it's being glued. I used a 4x4 post (and other heavy stuff) as a weight on this long scarf joint. The 4x4 is too rigid to give even pressure on the joint, so I put some cardboard under it to distribute the weight more evenly.


I decided to scarf the plywood pieces together instead of using butt blocks like shown in the plans. Scarfing is actually pretty easy. However, what I'm doing is more difficult, because the scarf joint has to be glued on the floor, (unlike the butt block joint that can be glued after the first section is on the boat). This means that I have to install the entire plank all at once instead of one section at a time. Nailing down this large piece of plywood before the glue sets is going to be quite a challenge. Wrapping it onto the hull requires a good twist and bend, adding to the difficulty.
I should have installed the bottom plywood first, since it's the most difficult. I don't have many spots to clamp it down, because the side planks are in the way. I think I may use a few screws toward the bow, like mini-clamps to hold it down while I bend it.
I'll let you know how it goes. Right now I'm not quite sure how its going to work, but I think I can do it.


I decided to scarf the plywood pieces together instead of using butt blocks like shown in the plans. Scarfing is actually pretty easy. However, what I'm doing is more difficult, because the scarf joint has to be glued on the floor, (unlike the butt block joint that can be glued after the first section is on the boat). This means that I have to install the entire plank all at once instead of one section at a time. Nailing down this large piece of plywood before the glue sets is going to be quite a challenge. Wrapping it onto the hull requires a good twist and bend, adding to the difficulty.
I should have installed the bottom plywood first, since it's the most difficult. I don't have many spots to clamp it down, because the side planks are in the way. I think I may use a few screws toward the bow, like mini-clamps to hold it down while I bend it.
I'll let you know how it goes. Right now I'm not quite sure how its going to work, but I think I can do it.
Tuesday, December 29, 2009
Planking started
I'm starting to put the plywood planking on the frame. First I have to scarf pieces of plywood together to make longer pieces. I'm not sure how you are supposed to do this, but this is how I am doing it. I clamp the plywood sheet over the boat, mark the outline where I want to cutout, then cut it out.

To make the scarf joint, I clamp four plywood pieces on top of each other on a table, with the edges stepped 3 inches apart. I use a hand plane and belt sander to make the 3 inch steps into a smooth ramp (with a 12:1 slope). Here is what it looks like finished. Not bad for my first plywood scarf.


I then test fit the pieces onto the boat and mark a straight line across the scarf joint, so that I can line them up about right when I glue them. I cut the pieces slightly wider than necessary, in case I don't scarf the pieces perfectly straight. Then I trim them more accurately with a hand plane after they are scarfed together.
Here is a pic of one plank already on the boat and another set being glued together. I just wrap the glue joint in plastic and put textbooks and an old axle on top to press it all together. I like textbooks, because I have them laying around and they are flexible, so they create even pressure on the glue joint. Sandbags or something would also probably work.

After the scarf joint is glued and the plank is trimmed to fit, it's glued and nailed to the frame. The nails went into the wood frame without splitting it, but I had quite a hard time sinking the nail heads below the surface of the hard plywood when installing the first plank. (Imagine me quickly hammering on a nail punch trying to finish before the glue cures, cursing while I keep smashing my hand with the hammer). So I modified a cheap wood drill bit to make a counterbore. The bit makes a nice flat counterbore with a shallow dimple to help start the nail (but not an entire pilot hole). This makes nailing the planks much easier. I make the counterbores very shallow, since this is very thin 1/4 inch plywood.
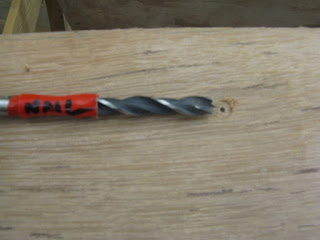
So I clamp the plywood to the boat (again), countersink all the nail locations, remove the plywood, apply the glue, and quickly nail it all back together before the glue cures. I punch the nail heads slightly beneath the surface of the plywood and cover them with thickened epoxy.
And here is a picture outside my garage workspace ... cold and snowy, but I'm still building in comfort.

Hmmm let's see, do I have any good animal pics ... here's a good one.


To make the scarf joint, I clamp four plywood pieces on top of each other on a table, with the edges stepped 3 inches apart. I use a hand plane and belt sander to make the 3 inch steps into a smooth ramp (with a 12:1 slope). Here is what it looks like finished. Not bad for my first plywood scarf.


I then test fit the pieces onto the boat and mark a straight line across the scarf joint, so that I can line them up about right when I glue them. I cut the pieces slightly wider than necessary, in case I don't scarf the pieces perfectly straight. Then I trim them more accurately with a hand plane after they are scarfed together.
Here is a pic of one plank already on the boat and another set being glued together. I just wrap the glue joint in plastic and put textbooks and an old axle on top to press it all together. I like textbooks, because I have them laying around and they are flexible, so they create even pressure on the glue joint. Sandbags or something would also probably work.

After the scarf joint is glued and the plank is trimmed to fit, it's glued and nailed to the frame. The nails went into the wood frame without splitting it, but I had quite a hard time sinking the nail heads below the surface of the hard plywood when installing the first plank. (Imagine me quickly hammering on a nail punch trying to finish before the glue cures, cursing while I keep smashing my hand with the hammer). So I modified a cheap wood drill bit to make a counterbore. The bit makes a nice flat counterbore with a shallow dimple to help start the nail (but not an entire pilot hole). This makes nailing the planks much easier. I make the counterbores very shallow, since this is very thin 1/4 inch plywood.

So I clamp the plywood to the boat (again), countersink all the nail locations, remove the plywood, apply the glue, and quickly nail it all back together before the glue cures. I punch the nail heads slightly beneath the surface of the plywood and cover them with thickened epoxy.
And here is a picture outside my garage workspace ... cold and snowy, but I'm still building in comfort.

Hmmm let's see, do I have any good animal pics ... here's a good one.

Sunday, December 20, 2009
Centercase installation
Building a boat takes a toll on your relationships with your loved ones. Here is Chloe barking at me telling me to stop working and pay attention to her. I listened and took a break.

This week, the sides of the centercase were glued together. I also added vertical strips of lumber on the side of the case for attaching the bulkhead. I attached those at this stage, since I wanted to nail it from the inside before putting it together. I also drilled the hole in the case logs for the centerplate pivot bolt, since this would be almost impossible to do after it's in the boat.
The centercase was then installed in the boat. The case was wiggled into position and pilot holes were drilled for the 3" bronze nails. The oak is really hard to screw into, so I had to put it all together (to make sure the screws went in without a problem), take it apart, then put it back together again with glue. Quite time consuming with 20 large screws, but the epoxy cures too fast to try to do it all at once.

Here is a pic after its installed with thickened epoxy. After it was screwed in, I poured unthickened epoxy in all the cracks on the top to fill in all the joints. The unthickened epoxy would normally leak out of a joint, but the thickened epoxy underneath kept it from leaking out. Temporary wedges were jammed into the slot to close the vertical glue joints nice and tight. It went together without a problem, except its sitting SLIGHTLY crooked, but I don't think anyone will notice except for me. The top of the case is about 3/16" off vertical. Not a problem.

The next day when the glue is dry, the wedges are removed and the sides are trimmed flush with a saw.

This is a top view of the front of the centercase. If you look close, you can see a thin white layer of fiberglass on the inside of the case. You can also see that the inside of the case has some epoxy fillets that I made when I was gluing the case together.

The keelson (large backbone member) is then shaped (with a hand plane) into a wide v-shape, so that the curved plywood bottom can fit up to it. So I guess that's it ... here's a skeleton of a boat! Next week I'll start the plywood planking.


This week, the sides of the centercase were glued together. I also added vertical strips of lumber on the side of the case for attaching the bulkhead. I attached those at this stage, since I wanted to nail it from the inside before putting it together. I also drilled the hole in the case logs for the centerplate pivot bolt, since this would be almost impossible to do after it's in the boat.
The centercase was then installed in the boat. The case was wiggled into position and pilot holes were drilled for the 3" bronze nails. The oak is really hard to screw into, so I had to put it all together (to make sure the screws went in without a problem), take it apart, then put it back together again with glue. Quite time consuming with 20 large screws, but the epoxy cures too fast to try to do it all at once.

Here is a pic after its installed with thickened epoxy. After it was screwed in, I poured unthickened epoxy in all the cracks on the top to fill in all the joints. The unthickened epoxy would normally leak out of a joint, but the thickened epoxy underneath kept it from leaking out. Temporary wedges were jammed into the slot to close the vertical glue joints nice and tight. It went together without a problem, except its sitting SLIGHTLY crooked, but I don't think anyone will notice except for me. The top of the case is about 3/16" off vertical. Not a problem.

The next day when the glue is dry, the wedges are removed and the sides are trimmed flush with a saw.

This is a top view of the front of the centercase. If you look close, you can see a thin white layer of fiberglass on the inside of the case. You can also see that the inside of the case has some epoxy fillets that I made when I was gluing the case together.

The keelson (large backbone member) is then shaped (with a hand plane) into a wide v-shape, so that the curved plywood bottom can fit up to it. So I guess that's it ... here's a skeleton of a boat! Next week I'll start the plywood planking.


Sunday, December 13, 2009
Transom Installed
The inside of the centercase is being fiberglassed. The process involves multiple coats of epoxy and one layer of fiberglass fabric. The fiberglass is transparent after it soaks up the epoxy. (Thanks to my heated garage I can epoxy all winter long).

Also, the transom has been cut out and installed. The transom was glued and nailed with bronze ring shank nails. At first I was more comfortable using screws, beacuse I was worried that the nails would split the frames or something. However, so far the nails have worked great with Douglas Fir, but I have to predrill little holes when nailing into the white oak. I've been punching them a little below the surface of the plywood, which hides the head and also helps close any gaps on the other side and gets good glue squeeze out.
Here are pics of the plywood being marked for cutting and then the transom after its glued and nailed. The plywood was roughly cut and the edges will be cleaned up after the glue dries. It's 3/8" plywood, thicker than the 1/4" used for most of the hull.


Also, the transom has been cut out and installed. The transom was glued and nailed with bronze ring shank nails. At first I was more comfortable using screws, beacuse I was worried that the nails would split the frames or something. However, so far the nails have worked great with Douglas Fir, but I have to predrill little holes when nailing into the white oak. I've been punching them a little below the surface of the plywood, which hides the head and also helps close any gaps on the other side and gets good glue squeeze out.
Here are pics of the plywood being marked for cutting and then the transom after its glued and nailed. The plywood was roughly cut and the edges will be cleaned up after the glue dries. It's 3/8" plywood, thicker than the 1/4" used for most of the hull.


Subscribe to:
Posts (Atom)